MS SharePoint
Zapier is a powerful integration platform that seamlessly connects thousands of tools with each other, including Cascade!
All you need to get started is a Cascade Premium or Enterprise subscription and a Zapier account.
MS SharePoint
Trigger

Cascade Action
MS SharePoint
Action
How does the integration work?
Using Zapier, Cascade allows you to update several important pieces of information from any app avalible on Zapier, such as:
- Update Action Current Progress
- Update Measure Current Value
- Update Measure Historical Value
Note: Cascade’s Zapier integration is currently in Beta. We are actively working on adding new Capabilities, Triggers and Actions. Stay tuned for more soon!
What is
MS SharePoint
?
Microsoft SharePoint helps you share, organize, and discover information
Ready to get started with Zapier?
If you already have a Cascade Premium or Enterprise subscription and you’re ready to get creative, you get started now with Zapier!
Integrate MS SharePoint with Cascade
You can get insights of your data stored in SharePoint in Cascade with this integration. A lot of actions can trigger the updates to Cascade - when an item is modified in a SharePoint list, or a file is updated, or a file is copied or moved, a new file is created, and so on. If you're storing your KPIs like Employee satisfaction being fed in from MS surveys and aggregated into a single SharePoint list item, Revenue earned from different sects of the business, number of tools in production, sales per employee, completion percentage of a task, number of marketing campaigns, and so on, you can get those values to be automatically updated in Cascade with this integration.
Every time the value changes in the SharePoint list, Cascade automatically updates those for you. This integration with Cascade is enabled through Power Automate.
Before you proceed, it's important that these pre-requisites are met:
- A 'measure' in Cascade that has Power Automate chosen as the tracking type, initial and target values defined.
- A SharePoint list that has the measure's progress value (that needs to be updated in Cascade).
- Microsoft 365 or Dynamics 365 license with Power Automate capabilities.
See How to Use Power Automate with Cascade page to establish a connection between Cascade and Power Automate. Though you can define any trigger from SharePoint, we're now going to look at the most frequently used trigger - when an item is modified.
In the Power Automate's Cascade environment page, click Update a Cascade measure when an item is modified in a SharePoint list.
When you select Power Automate from the measure's tracking section, a modal pop-up redirects you to Power Automate. You'll now see the Power Automate's Flow interface.
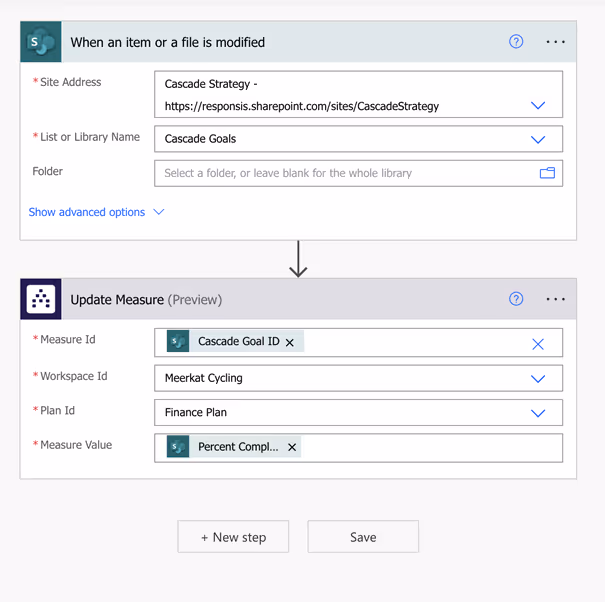
1. Set up the Trigger:
Once logged into the Microsoft account, the SharePoint sites, and the lists are automatically synced to Power Automate. Now, from the drop-down list, select the SharePoint site, and the list in which the measure resides.
2. Update Measure in Cascade:
Currently, with Power Automate integration, you can only update a measure's progress. However, we'll be adding more actions and triggers in future. If there're any additional triggers or actions that you would like to see us support, please let us know via live chat.
The template is prefixed to choose the app and event (update measure) and lets you to connect your Cascade account directly in this step. Select the account, or create a new one to connect to.
You'll need to sign into your Cascade account within Power Automate to give it the permissions it needs to update information. However, if you wish to create a new connection, click the three dots against the Update Measure title, click +Add new connection. All these connections will be available in Data > Connections from the left navigation pane.
Choose the workspace, plan, the relevant measure (those with numerical fields are automatically listed) and its value, and click Save.
Click Test on the top-right corner, select Manually, and click Test to test the flow. From the left navigation pane, click My Flows, and choose this flow that we just created. Under the 28-day run history, click All runs to refresh the flows to see if the flow failed or succeeded. If successful, the value will be updated in the Cascade's measure. If failed, click on it, and from the Error details that's displayed, analyze the issue or report to us to get it fixed.
You've now successfully established the trigger and action. Now, with ease and no efforts from you, your values will get updated automatically in Cascade, every time there's a change in the values in the SharePoint lists.
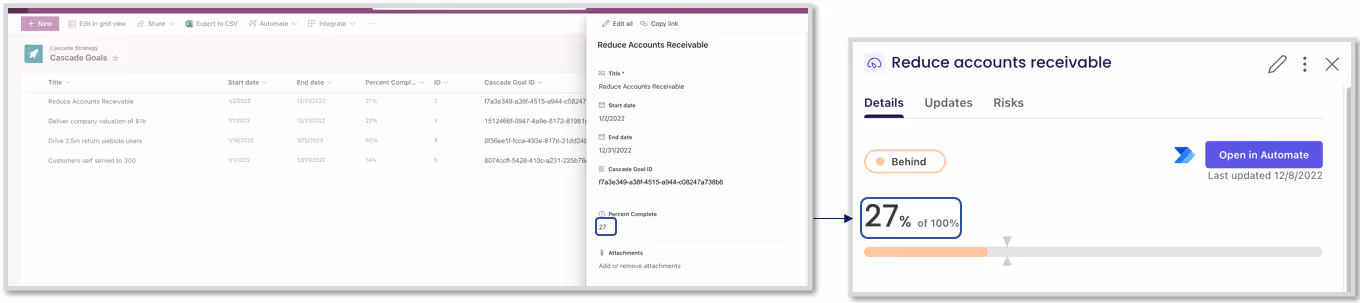
Go to Cascade, and in the measure that you chose Power Automate as tracking, you'll see the progress updated. It might take a while to reflect the progress. Click

to look at the historical progress values from the goal hub.
Conditional formatting of the Power Automate flow:
This flow will trigger every time a SharePoint list item or file is modified. You will want to make sure that the correct information will be brought into the corresponding measure within Cascade. To do that there will need to be a mapping of SharePoint list item to Cascade measure. The easiest way to do this would be to store the Cascade measure ID within the corresponding SharePoint item, and within your Power Automate flow make sure to add in the condition to check if the Cascade Goal ID exists before it sends things to Cascade. This is how you can create nuanced flows within Power Automate that have to satisfy certain conditions before running.
Once you get this skill down Power Automate will be a very powerful tool to use with Cascade. For more details on this conditional formatting, please reach out to us.
For more help with the SharePoint-Power Automate workflows, please refer here in Power Automate Help Center.
FAQs
My Power Automate flow failed. How should I proceed?
Click My Flows, and choose the flow that you're working on. Now, click on the flow that failed, and from the Error details displayed on the right sidebar, analyze it or report to us to fix it.
There is a connection error with Power Automate.
From the left navigation pane, click Data > Connections, and delete the connection that you used. Now, when you start with the flow, it'll establish a new connection. At any point in time, you can click the three dots against the action title, and click +Add new connection.